How to Paint a Nose: A Step-by-Step Guide to Drawing and Painting the Nose
The nose is mostly shapes and angles, not detail. Learn to see it with your right brain, draw it from simple forms, then paint it dark to light with warm and cool color.

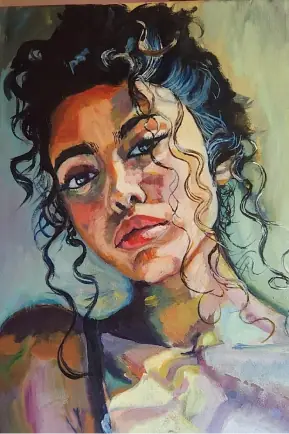
To paint a nose, draw it first from basic shapes, then model it with color. Sketch a circle for the tip, two smaller circles for the nostrils, trace the rest of the outline, and shade the creases. Then paint the outlines in a cool dark color, keep cools running down the bridge, warm the tip with a cadmium color, and add your lightest highlights at the very end. The whole trick is to see the nose as shapes and angles instead of outlining what you think a nose looks like.
That last point is where most noses go wrong. Drawing or painting facial features takes less raw talent than it takes trained seeing, and learning to see is a skill you can build deliberately. So before any step below, change how you look at your source.
Why do you have to use your right brain to draw a nose?
You use your right brain because it sees real shapes, while the left brain sees symbols. If you draw the nose from the left brain, your lines round off and the result looks cartoony, because you are drawing the idea of a nose instead of the one in front of you. When you switch to the right brain, you stop labeling and start observing: you break the image into shapes, angles, and the spaces between edges, and the drawing immediately gets more accurate.
This sounds simple, and it is, but do not underestimate it. Learning to look past the outline and find the angles inside it is the single change that turns a stiff, generic nose into one that belongs on a real face. If your features keep coming out cartoony, the fix is almost never more detail. It is more honest seeing. A few right brain exercises make this switch easier to reach on demand.
What shape is the nose you are drawing?
Before you draw a single line, look hard at what kind of nose your source actually has. It may be right under your nose, but no two are alike. One is straight and narrow. Another is short with a turned-up tip. Another is large and bulbous. The reason this matters is that the shape decides everything downstream: where the tip sits, how wide the nostrils flare, how steep the bridge runs, and where the light catches.
So look past the outlining shape first. Then use your right brain to hunt for the smaller angles and shapes living inside those outer edges. A long straight nose hides a different set of internal planes than a short upturned one, and your job is to find the specific planes on the specific nose in front of you rather than reaching for a default. Once you have actually seen the shape, the drawing steps below stop being a formula and start being a description of what you are looking at.
How do you draw a nose step by step?
Draw the nose from simple shapes first, working light to dark, and check your source constantly for the real angles. Here is the sequence:
- Use light strokes to draw a circle for the tip of the nose.
- Add the smaller circles for the nostrils on each side. Seeing these basic shapes first keeps your proportions honest, and a good light source on your subject makes the shapes easier to identify.
- Check your source again, looking for the shapes and angles that keep the proportions accurate.
- Trace the outline of the rest of the nose.
- Begin adding darker pencil strokes as you shade the creases and folds, filling in the form.
- Once the sketch is finished, spray fixative to hold your pencil lines in place.
Work loosely on the first pass. The circles are scaffolding, not the finished drawing, and they exist so you commit to the big shapes before you fuss over edges. Resist the urge to outline and then immediately render every pore. The order matters: shapes, then angles, then value, then detail. Skip a stage and the nose either floats off the face or hardens into the cartoon look you were trying to avoid. If you can nail the nose, the same shape-first approach carries straight into the rest of the face, including how to paint eyes.
How do you paint a nose realistically?
Paint a nose realistically by laying your warm and cool colors in the right places and working dark to light. Cool colors make form recede, warm colors push it forward, so the nose turns from flat to dimensional based on where you place temperature, not on how much outline you add. Save your very lightest highlights for the final pass.
This is the single biggest reason a painted nose looks flat or muddy: the values and the color temperature are in the wrong places. Get them right and you barely need detail at all, because the eye reads form from light and color long before it reads a clean edge. Lay your warms and cools deliberately on this feature and the same discipline pays off across the whole face.
Here is the painting sequence:
- Paint the outlines of the nose with a cool, dark color. Do not chase fine detail yet. Be expressive and start with loose, flowing strokes, because this first layer is not meant to be perfect.
- Keep using cooler colors down the length of the nose, especially in the dip just before the bridge, between the eyebrows. Vary the cools rather than using one flat tone.
- Warm the ball or tip of the nose, since that is the part that comes forward the most. Cadmium colors work well here because they read very warm. Highlights still come later.
- Add your warmer highlights to the spots you want to pop forward, and place a cooler highlight in the dip as you reach the bridge.
If you want to understand the layering that sits underneath this, the three core oil painting techniques that make a portrait look professional explain how those warm and cool passes build on each other. The same warm-forward, cool-back logic applies whether you are working in oils or in acrylic portrait painting.
What are the key takeaways for drawing or painting the nose?
The whole approach comes down to a few principles you can apply to any nose, on any face:
- Engage your right brain and look for the shapes and angles inside your source, not the outline you expect to see.
- When painting facial features, work dark to light.
- Place your warm and cool colors deliberately: warm for the areas you want to bring forward, cool for the areas you want to recede.
- Be expressive and bold when you lay down your marks, especially on the first loose layer.
Get these four right and the nose stops being the feature you dread. It becomes one more set of shapes you already know how to handle, and the same thinking sits behind every feature you draw, because it all traces back to the 7 elements of art.
Quick answer
To paint a nose, draw it first from basic shapes: a circle for the tip, two smaller circles for the nostrils, then trace and shade the rest. To paint it, lay the outlines in a cool dark color, keep cools along the bridge, warm the tip with a cadmium color, and add your lightest highlights last. See shapes, not symbols.
The nose was never the hard part. Trained seeing is, and that is a skill, not a gift. If you want a structured, supported way to build it, the free Two Week Challenge walks complete beginners through exactly this kind of seeing, and the rest of our oil painting techniques collection is here when you want to keep going.
Frequently asked questions
How do you paint a nose step by step?
Draw the nose first from basic shapes: a circle for the tip, smaller circles for the nostrils, then trace the outline and shade the creases. To paint it, lay the outlines in a cool dark color with loose strokes, keep cools running down the bridge, warm the tip and ball of the nose with a cadmium color, and finish with your lightest highlights last.
How do you draw a nose for beginners?
Start with light strokes and simple shapes instead of trying to outline the whole nose at once. Draw a circle for the tip, add two smaller circles for the nostrils, then check your source for the real angles before you trace the rest. Shade the creases and folds with darker pencil, and spray fixative when your sketch is done so the graphite stays put.
Why does my drawn nose look cartoony?
A nose looks cartoony when you draw what you think a nose looks like instead of what is actually in front of you. That habit comes from the left brain, which rounds everything into symbols. Switch to seeing with your right brain: look past the outline for the real shapes and angles inside the edges, and your lines stop looking generic.
What colors do you use to paint a nose?
Use cool colors where the form recedes and warm colors where it comes forward. Keep cools along the length and the dip at the bridge between the eyebrows, and warm the tip and ball of the nose with a cadmium color since that is the part closest to the viewer. Paint dark to light and save your lightest, warmest highlights for the very end.
How do you make a nose look three dimensional?
Model it with value and color temperature, not outline. Paint dark to light so the form turns gradually, push warm color onto the parts that come forward and cool color into the parts that recede, and place your brightest highlight only on the spot catching the most light. Working with a clear light source on your subject makes those shapes far easier to read.
What to practice this week
- Draw the same nose three times from one photo: once as flat outline, once broken into circles and angles, and once fully shaded, so you feel how seeing shapes beats copying contours.
- Do a small warm-and-cool study of a nose: block in the outlines with a cool dark, lay cools down the bridge, warm the tip with a cadmium color, and add highlights only at the very end.
- Set up good light on a face or a cast and draw just the nose for ten minutes, hunting only for the angles inside the outer edge.
Supplies used

About the author
More from Elli