How to Paint Eyes in Oil and Acrylic: A Step-by-Step Guide
A clear, repeatable process for painting an eye that actually looks back at you, whether you work in oil or acrylic.

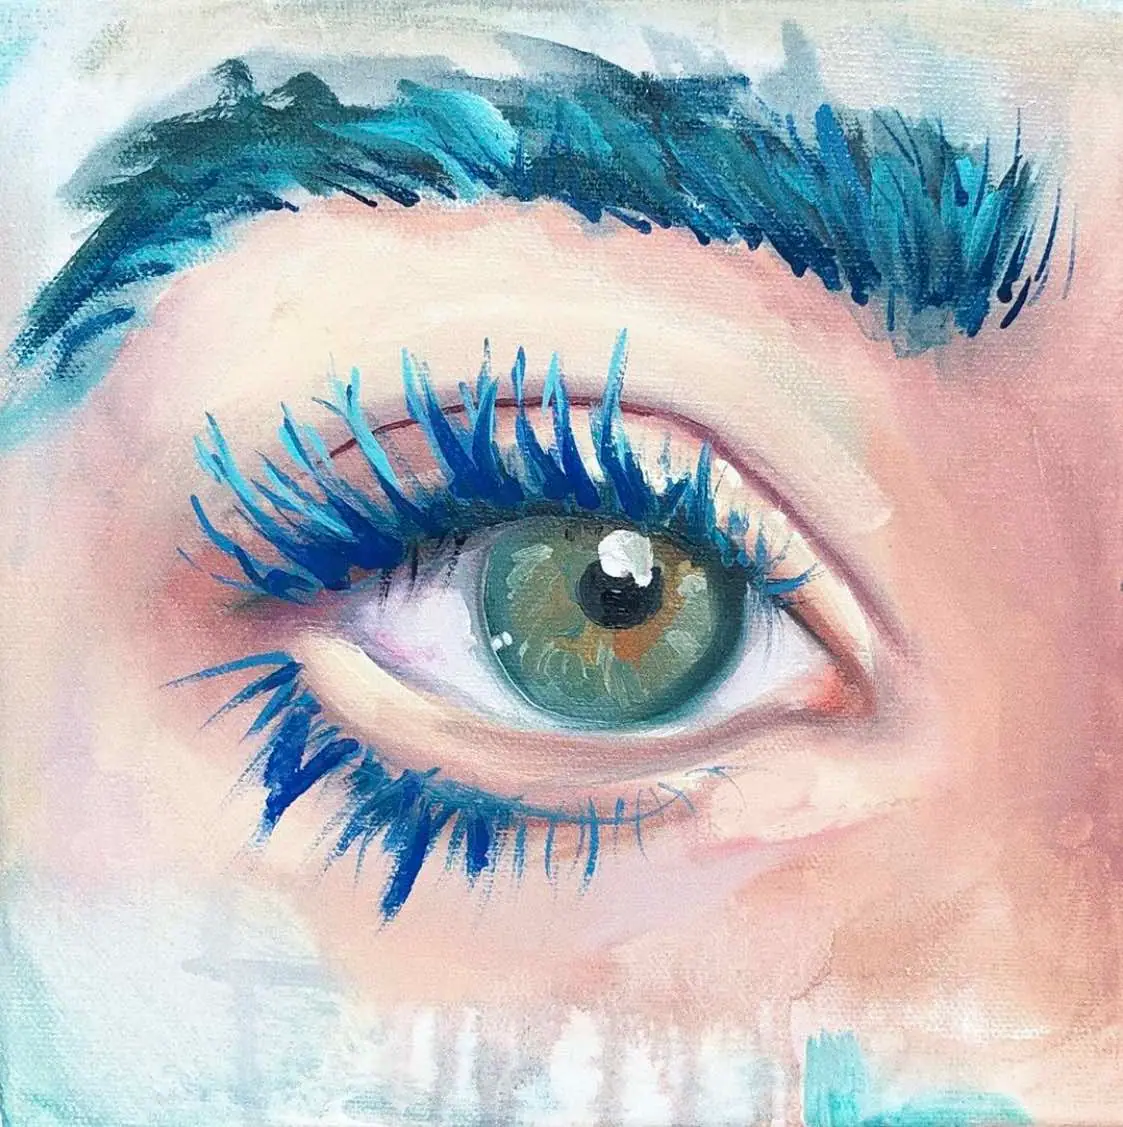

Painting a realistic eye comes down to two things: understanding the structure of the eye, and knowing how to handle your paint. Get the almond shape and the iris angle right, then work your values from dark to light, and the eye will look back at you instead of past you. This guide walks through the whole process step by step, for both oil and acrylic, so you can paint an eye that feels alive.
If you have ever painted two eyes that ended up looking in different directions, you are in good company. The fix is not talent. It is a repeatable process, and you can learn it.
What is the basic anatomy of an eye?
The eye is a set of simple shapes, and learning them is the key to painting a realistic one. Most eyes share an almond shape, though some sit more rounded and others more narrow. Once you see the eye as a structure rather than a mystery, it stops being intimidating.
The iris is the part that directs the gaze, and each iris sits at a very specific angle. To get two eyes looking the same way, measure the angle of the iris from its highest point to its lowest point. Those two points sit opposite each other, and that angle tells you exactly where to place and shape the iris. This single habit is what stops your subjects from looking cross-eyed.
The tear duct matters too. Keep it gently rounded, and make sure it transitions smoothly into both the top and bottom eyelid. A soft, rounded tear duct reads as natural, while a sharp or flat one breaks the illusion.
If faces are new to you, it helps to study the whole structure first. Our guide on how to draw a self-portrait walks through placing the features in proportion before you ever pick up paint.
What is the best technique for painting eyes?
You can paint an eye in any medium you are comfortable with, but the alla prima method is the most beginner-friendly. Alla prima means “at first attempt,” painting wet into wet in one sitting, with one layer, fairly quickly. I love this approach for eyes because it keeps the paint fresh and the transitions soft, and it works with both acrylic and oil.
The process is the same in both mediums. You map the shape, sketch the contour, block in your darkest values, then build up through the midtones to your highlights. The only real differences are what you mix into the paint and how fast it dries. Once you understand the sequence, you can paint an eye with whatever is on your table.
How do you paint eyes with oil paint?
To paint an eye in oil, start by killing the white of the canvas, then sketch the contour and build from dark to light. Oil stays wet, which gives you time to blend the soft transitions an eye is full of. Here is the step-by-step process.
- Wash out the white. Do a thin, drippy wash over the whole canvas in any light color to get rid of the bright white ground. Thin the paint with a little paint thinner and use a large brush so it goes on fast and loose.
- Sketch the outer contour. Mix a darker color with thinner and use a small, round, pointed brush to draw the outline. From the tear duct, run a straight line slightly tilted, then a soft curved line connecting to the back corner of the eye. The bottom line is much softer, swooping under the eye back to the tear duct.
- Sketch the iris and the crease. Add the iris at the angle you measured, then lightly mark the crease above the top eyelid.
- Block in the darkest darks. Switch to a medium brush and fill the largest dark areas, the values between 6 and 10 on a value scale. That means the pupil, the creases, and the shadow under the eyelid.
- Build up the midtones and highlights. Keep working from dark to light, blocking midtones before you ever touch the brightest lights. Mix a medium like linseed oil or galkyd into the paint to keep it fluid as you blend.
A note on the whites of the eye, because this is where most painters slip: never use straight white paint, especially here. The whites of an eye are always tinted by the light around them. Painting from your head rather than a reference? Mixing in a little Payne’s grey or brown pink is a safe bet. The whites lean a touch more colorful and grey along the edges and corners, and brighter near the iris.
If you want to ground all of this in a wider foundation, our overview of essential oil painting techniques covers washes, blocking in, and glazing in more depth.
How do you paint eyes with acrylic paint?
Painting an eye in acrylic follows the exact same sequence as oil, with two small swaps. Acrylic dries at lightning speed compared to oil, which actually makes alla prima painting easier, because each layer sets quickly and you can keep moving.
The only differences are your additives. Use water instead of paint thinner to thin your contour sketch and your wash, and mix in a retarder instead of galkyd to slow the drying and keep the paint workable while you blend. Everything else, the wash, the contour, the dark-to-light build, stays identical.
Keep a good variety of brushes and a full range of colors out on your palette before you begin, because acrylic dries too fast to go hunting for a color mid-stroke. Once your acrylic eye is finished, you can take it further by glazing over it with transparent oil colors. Glazing means laying a transparent layer of paint mixed with a medium over what you have already painted, which adds depth and saturation without hiding your work underneath.
How do you paint the iris and the reflection in the eye?
The iris is painted in layers, working from the darkest color up to the lightest streaks and the final sparkle. The smaller the eye, the finer your brush needs to be, so choose a brush suited to tiny details before you start.
- Lay the darkest layer first. Begin with the deepest color visible in the iris and cover that base.
- Add the lighter streaks. Use a small brush to paint the beautiful, colorful streaks that radiate through the iris. A size 4 filbert is a great choice here, since it gives you a useful range of stroke widths. Keep working from dark to light, never jumping straight from the darkest base to the brightest highlight.
- Place the sparkle. This is the detail that brings the eye to life, and it depends on a clean brush. Mix your bright highlight color and let it sit on the very tip of the brush. Do not press or grind the paint into the bristles, because then you would have to smudge it onto the surface, which ruins the effect.
- Let the brush kiss the surface. Lightly scoop the mixed color onto the tip, then let the brush barely touch the canvas to drop in the sparkle. The bright color sits on top of the darks you already painted, so the highlight stays small and crisp instead of large and smudgy.
That single clean sparkle is what makes an eye look wet and reflective. It is worth practicing on its own until it feels natural.
How do you paint eyelashes?
Paint eyelashes last, and start each lash from under the eyelid rather than from the lid edge. Eyelashes are the finishing touch, the cherry on top, and the brush you use makes all the difference. Invest in a good quality script brush and keep it clean and fresh, because frayed bristles send lashes in every direction and ruin the effect.
The key to a believable lash is the swoop. Bring your brush down from under the eyelid first, then carry it up in a big swoop. If you start by going straight up, the lash reads flat and has almost no dimension. That little downward start before the upward sweep is what gives each lash its natural curve.
Once the lashes are in, you have painted a complete eye, structure, value, color, and detail working together. The same logic carries into the rest of the face and into nearly anything else you paint.
What should you remember when painting eyes?
Remember that a convincing eye is built in order, from structure to value to detail. Map the almond shape and the iris angle, sketch your contour, block your darks, climb from midtones to highlights, layer the iris, place one clean sparkle, and finish with soft lashes. Follow that sequence and your eyes stop wandering and start looking back.
If you want to feel more confident with the small tools that make these details possible, our guide on how to choose a paintbrush covers the pointed rounds, filberts, and script brushes mentioned here. And the broader craft of layering and value lives in our collection of painting techniques.
The structure of an eye is learnable, and so is everything else that intimidates you on the canvas. If this process gives you a foothold, keep going with the rest of our oil painting techniques collection. When you are ready to put a brush in your hand and try it for yourself, the free 2-Week Challenge is a gentle place to begin.
Frequently asked questions
Why do my painted eyes look cross-eyed?
Cross-eyed results almost always come from mismatched iris angles. Measure the angle of each iris from its highest point to its lowest point and make sure both eyes share the same line of direction. Mapping that angle before you paint keeps both eyes looking the same way.
Is it easier to paint eyes in oil or acrylic?
Both work well, and the process is nearly identical. Acrylic dries fast, which makes alla prima painting quick and forgiving for beginners. Oil stays wet longer, so you can blend soft transitions in the iris and whites. Many artists paint the eye in acrylic, then glaze over it with transparent oils for depth.
What brush is best for painting eyelashes?
A good quality script brush with a long, fine point is best for eyelashes. Keep it clean and unfrayed, because splayed bristles make lashes look messy. A size 4 filbert is the brush most artists reach for when painting the colored streaks inside the iris.
What to practice this week
- Paint three irises in a row, each looking a different direction, mapping the angle from top to bottom before you start so both eyes in a pair always match.
- Mix the whites of an eye without using straight white paint. Tint your white with a touch of Payne's grey or brown pink and notice how much more believable it looks.
- Practice the highlight alone: scoop a bright mix onto the tip of a clean brush and let it kiss the surface, so the sparkle stays small and crisp instead of smudgy.
Supplies used

About the author
More from Elli