Acrylic Portrait Painting: How to Paint a Portrait With Acrylics
Acrylics dry fast and forgive mistakes, which makes them a strong medium for portraits. Here is how to build one from the first line drawing to the final brushstroke.

To paint a portrait with acrylics, build it in order: draw the structure of the face first, block a thin underpainting to lock your values, mix skin tones from warm and cool colors, and then build form with brushstrokes that follow the planes of the face. Detail comes last, on top of correct shapes. Acrylic is a strong medium for this because it dries fast and lets you paint over mistakes, so a portrait that is going wrong is never stuck that way.
That forgiveness is the reason acrylic suits beginners better than its reputation suggests. Oil stays wet for hours, which is wonderful for soft blending but unforgiving of indecision. Acrylic asks you to commit, then rewards you by letting you correct freely once the layer dries. The whole process below is built around that rhythm: decide, place, dry, adjust. Master that loop and a likeness stops feeling like luck.
How do you start an acrylic portrait?
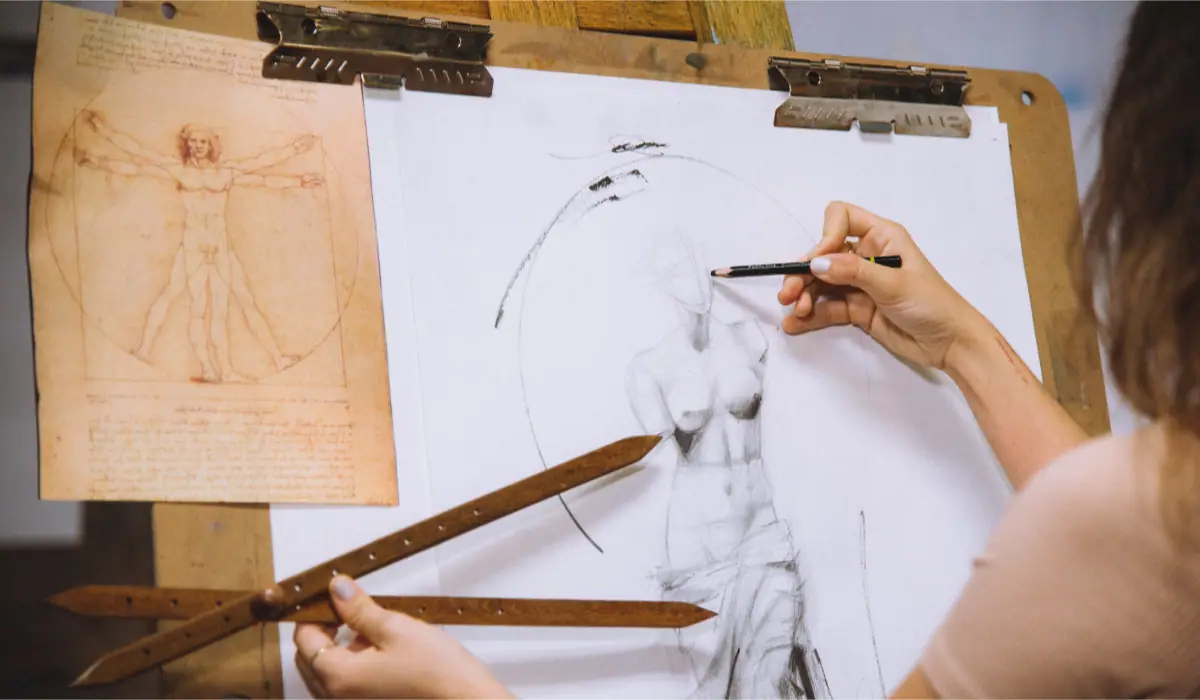
Start with the drawing, because no amount of good color will save a face whose proportions are off. Before you open a single tube, map the structure of the head: the placement of the eyes on the centerline, the width of the nose, the angle of the jaw. Get the architecture right while it is still cheap to fix, with a pencil and not a brush.
Many people are taught the grid method, where you divide your reference and canvas into matching squares. It works, but it can make you copy boxes instead of seeing the head as a whole. A cleaner approach is angular line drawing, where you look for the real angles between features and lay them in as straight lines first. A proportional scale tool helps here: it lets you measure the relationships in your reference and transfer them accurately without covering your canvas in a grid. The goal is the same either way. Fix the structure now so the painting that follows has somewhere solid to stand. If you want a dedicated walkthrough of facial structure, how to draw a self-portrait covers the foundations in depth.
What is an acrylic underpainting and why does it matter?
An underpainting is a thin first layer that establishes your values before you commit to color, and it is the step beginners skip most often. Use an acrylic wash, which is just acrylic paint loosened with water, to cover every bit of white canvas and block in where the darker tones belong. Working from a photo reference, fill the lightest areas with a pale tone and push the shadow shapes darker, so the whole face reads in light and dark before any skin color appears.
This layer is your roadmap. Acrylic dries fast, so within minutes you have a complete value map to paint over, and that early clarity is what keeps a portrait from going muddy three layers in. Value, meaning how light or dark something is, does more work than color in making a face read as three-dimensional. Set it correctly here and every later decision gets easier. Skip it, and you spend the rest of the painting guessing.
How do you build realism with brushwork?
Build realism by letting your brushstrokes describe the form, with each stroke following the planes of the face rather than smearing across them. The cheek, the brow, the bridge of the nose: each is a small plane turning in space, and a stroke laid along that plane tells the eye which way the surface faces. This is how you get volume without overblending everything into a soft, lifeless blur.
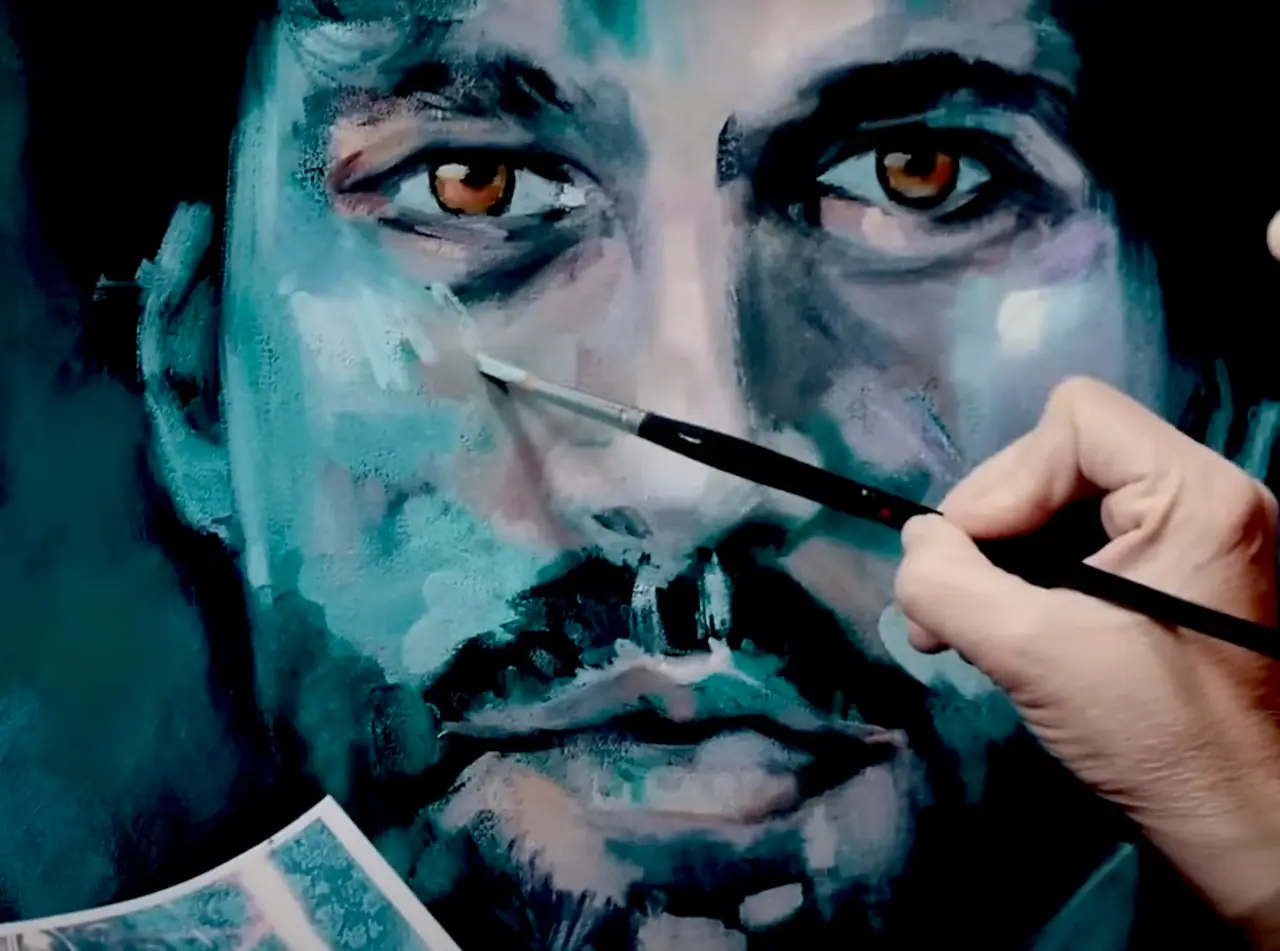
Then let those strokes stay. Acrylics naturally hold a bold, visible mark, and leaving that brushwork in the finished piece adds movement, energy, and a sense of the hand that made it. Overblending is the most common way beginners drain the life out of a portrait. The goal is not a photograph; it is a painting that reads as alive. Use deliberate, directional strokes to define structure, and reserve smooth blending for the few edges that genuinely need to soften, like the transition where a cheek turns into shadow.
How do you mix skin tones in acrylic?
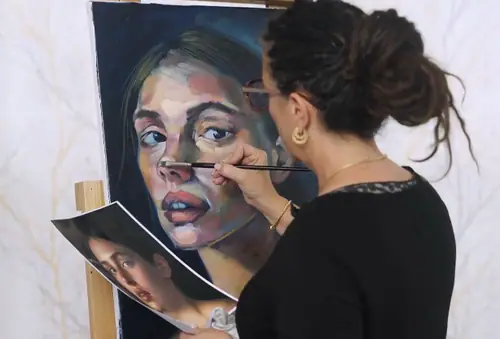
Mix skin tones by balancing warm and cool colors, never by trusting a single skin tone tube to do the work. Real skin is a quiet argument between temperatures: it runs warmer where blood sits close to the surface, like the cheeks, nose, and ears, and cooler in shadow, around the jaw, and toward the edges of the form. A face painted in one flat tone looks like a mask. A face built from shifting warm and cool notes looks like it has blood under the skin.
Mix a base tone that matches the midtone of your subject, then make a small string of variations: a warmer version and a cooler version of that same value. Place the warm notes where the light is direct and the skin is thin, and let the cool notes fall into the shadows and the planes turning away from the light. That temperature contrast is what creates lifelike depth. If your color keeps turning chalky or dull, your wash may be too watery; how to thin acrylic paint explains how much water is too much before the pigment breaks down.
How do you choose and use reference photos ethically?
Choose references with strong, clear lighting and use them ethically, which means painting from photos you have the right to use. Look for images with a defined light source, readable facial features, and some emotional resonance, because a flat, evenly lit snapshot gives you nothing to model with. Strong light creates the shadow shapes that let you build form in the first place.
On the ethics: do not copy another artist’s painting or a copyrighted photo and present the result as your own. Paint from your own photography, from royalty-free sources, or change a reference substantially enough that the work becomes your own expression. This is not just courtesy, it is the law in the United States, and it is worth understanding before you sell or share a piece. Jake Dunn breaks down what you can and cannot do with reference photos under U.S. copyright in this video. When in doubt, shoot your own reference. A portrait built from a face you actually saw almost always carries more truth anyway.
What tools and studio habits make acrylic portraits easier?
The right tools and a few simple habits remove most of the friction beginners blame on themselves. Brushes are the tool that matters most, so keep a small range of shapes and learn what each one does: a flat for blocking planes, a filbert for soft edges, a small round for the eyes and final marks. Varied brushwork is how you get texture, edge control, and flow into a portrait, and our guides on how to choose a paintbrush and the best brushes for acrylic painting walk through the shapes worth owning.
Acrylic is hard on brushes because it dries inside the bristles and ruins them fast, so clean them promptly, before the paint sets, and reshape the tip while damp. Keep your space ventilated and choose non-toxic cleaners where you can. Beyond the brushes, the eyes deserve their own attention, since they carry most of a portrait’s presence; how to paint eyes covers that in detail. None of this is glamorous, but small studio discipline is what lets you focus on the painting instead of fighting your materials.
How do you push past the fear of painting a face?
Push past the fear by accepting that resistance is normal and painting anyway. Portraits intimidate people because a face is the one subject everyone can instantly tell is off, and that pressure shows up as procrastination, self-doubt, or the quiet voice that says you are not ready. That voice tends to get loudest right before the work that matters most. It is not a verdict on your ability. It is just fear wearing the costume of a fact.
The way through is reps, not readiness. Challenge yourself to paint a self portrait every six months to a year. It will feel exposing the first time, and the second time, and then one day you will line the studies up in a row and see exactly how far your eye and hand have traveled. That visible progress is what replaces fear with quiet confidence. You do not wait to feel ready and then paint. You paint, badly at first, and the readiness arrives on the other side of the doing.
Quick answer
To paint a portrait with acrylics, draw the structure of the face first, then block a thin underpainting to set your values. Mix skin tones from warm and cool colors, and build form with brushstrokes that follow the planes of the face. Because acrylic dries fast and lets you paint over mistakes, it forgives beginners more than most mediums do.
Frequently asked questions
How do you paint a portrait with acrylics step by step? Start by drawing the structure of the face to fix your proportions, then block a thin acrylic underpainting that sets your darkest and lightest values. Mix skin tones from warm and cool colors rather than one tube, and build form with brushstrokes that follow the planes of the face. Add detail last, on top of correct shapes and values, not before them.
Are acrylics good for portrait painting for beginners? Yes. Acrylic is one of the most forgiving mediums for a beginner portrait artist because it dries fast and lets you paint over a mistake once the layer is dry. That means a misplaced eye or muddy skin tone is never permanent. The fast drying does push you to mix and place color decisively, which is a useful habit to build early.
How do you mix skin tones in acrylic? Mix skin tones by balancing warm and cool colors instead of reaching for a single skin tone tube. Skin is never one flat color: it shifts warmer where blood is close to the surface and cooler in shadow and around the edges. Build a base tone, then push small areas warmer or cooler to create lifelike depth rather than a flat mask.
Do you need to seal an acrylic portrait painting on canvas? Sealing is optional but worth it. A coat of varnish over a finished acrylic portrait protects the surface from dust and UV, evens out shine, and deepens the colors. Let the painting cure fully first, usually a few days to a week, then apply varnish in thin even coats so the surface stays smooth.
Should you blend acrylic portraits smooth or leave the brushstrokes? Leaving visible brushwork is a deliberate choice, not a flaw. Acrylics lend themselves to bold, directional strokes that add movement and personality, and overblending often kills that life and flattens the form. Use strokes that follow the planes of the face to describe structure, and reserve smooth blending for the few places that genuinely need a soft edge.
Start where every portrait starts: with one face, drawn carefully and blocked in honestly. The fastest way to build these fundamentals with real feedback is our free Two Week Challenge, a guided way to actually make paintings instead of only reading about them. When you want to keep going, the rest of the oil painting techniques collection covers the brushwork, color, and surface skills that carry straight over into your portraits.
Frequently asked questions
How do you paint a portrait with acrylics step by step?
Start by drawing the structure of the face to fix your proportions, then block a thin acrylic underpainting that sets your darkest and lightest values. Mix skin tones from warm and cool colors rather than one tube, and build form with brushstrokes that follow the planes of the face. Add detail last, on top of correct shapes and values, not before them.
Are acrylics good for portrait painting for beginners?
Yes. Acrylic is one of the most forgiving mediums for a beginner portrait artist because it dries fast and lets you paint over a mistake once the layer is dry. That means a misplaced eye or muddy skin tone is never permanent. The fast drying does push you to mix and place color decisively, which is a useful habit to build early.
How do you mix skin tones in acrylic?
Mix skin tones by balancing warm and cool colors instead of reaching for a single skin tone tube. Skin is never one flat color: it shifts warmer where blood is close to the surface and cooler in shadow and around the edges. Build a base tone, then push small areas warmer or cooler to create lifelike depth rather than a flat mask.
Do you need to seal an acrylic portrait painting on canvas?
Sealing is optional but worth it. A coat of varnish over a finished acrylic portrait protects the surface from dust and UV, evens out shine, and deepens the colors. Let the painting cure fully first, usually a few days to a week, then apply varnish in thin even coats so the surface stays smooth.
Should you blend acrylic portraits smooth or leave the brushstrokes?
Leaving visible brushwork is a deliberate choice, not a flaw. Acrylics lend themselves to bold, directional strokes that add movement and personality, and overblending often kills that life and flattens the form. Use strokes that follow the planes of the face to describe structure, and reserve smooth blending for the few places that genuinely need a soft edge.
What to practice this week
- Block a portrait in only three values first: darkest darks, mid tone, and lightest lights, using a thin acrylic wash before you touch any color.
- Mix a small skin tone string by hand: a warm version, a neutral version, and a cool version of the same tone, then place them where the light shifts on the face.
- Paint a self portrait from a mirror once every six months and keep them in a folder so you can watch your own progress over time.
Supplies used

About the author
More from Elli