DIY Paint Palette: How to Make a Glass Palette for Oils and Acrylics
A glass palette is cheap to build, wipes clean in seconds, and lasts for years. Here is the full DIY: the parts, the build, the right size, and why glass beats every disposable option.

To make a DIY paint palette, you sandwich a clean piece of glass over a white backing on a board cut slightly larger than the glass, then wrap the edges in solid neutral duct tape. That is the whole build, and it takes about ten minutes. A glass palette is cheaper than the disposable options, wipes clean in seconds, and lasts for years, which is why so many professional painters use one for both oils and acrylics. Below is exactly what you need, how to put it together, and the small choices that make it work.
When you picture an artist’s palette, you probably think of the classic wooden hand-held kind, a disposable pad of palette paper, or a paper plate. Plenty of painters start with one of those. But a glass palette beats all of them in the long run. It does not absorb paint, it does not stain, and it gives you a clean, neutral surface every single time you mix. There is also something worth saying about making your own tools: the artist who can build a simple part of their own setup is a little more self-reliant, and a little less dependent on the art store for everything.
What supplies do you need to make a glass palette?
You need four things: a piece of glass, a piece of wood, a white backing, and solid neutral duct tape. None of it is expensive, and you may already have most of it at home. Here is what each part does and how to choose it.
- A piece of glass. Use real glass, ideally tempered glass, because it is more durable than plexiglass and resists scratching from your palette knife. Make sure it is clean and free of fingerprints before you build. You can buy a cut piece at a hardware or glass store, or for a cheaper option, go to a thrift store and buy an old picture frame just to repurpose the glass inside it.
- A piece of wood. Cut the board slightly larger than the glass so it protects the edges and gives you something solid to tape against. You can cut it to size yourself, or have your local hardware store cut it for you while you are picking up the glass.
- A white backing. Paint the wood white, or slip a white sheet of paper between the glass and the board. If you use paper, cut it to the same size as the glass so it sits flush. A light neutral gray is an excellent option too, since it reads closer to a midtone, but if you are not confident matching that shade, plain white works beautifully.
- Heavy-duty duct tape. Choose a solid, neutral color, gray is ideal. Avoid colorful or printed tape, because a loud color in your peripheral vision throws off your eye when you are trying to mix clean, accurate color. The tape both seals the edges and holds the whole sandwich together.
How do you build the glass palette step by step?
Building the palette is mostly assembling the sandwich and sealing the edges, and it goes quickly once your parts are cut to size. Work on a flat, clean surface so nothing shifts while you tape.
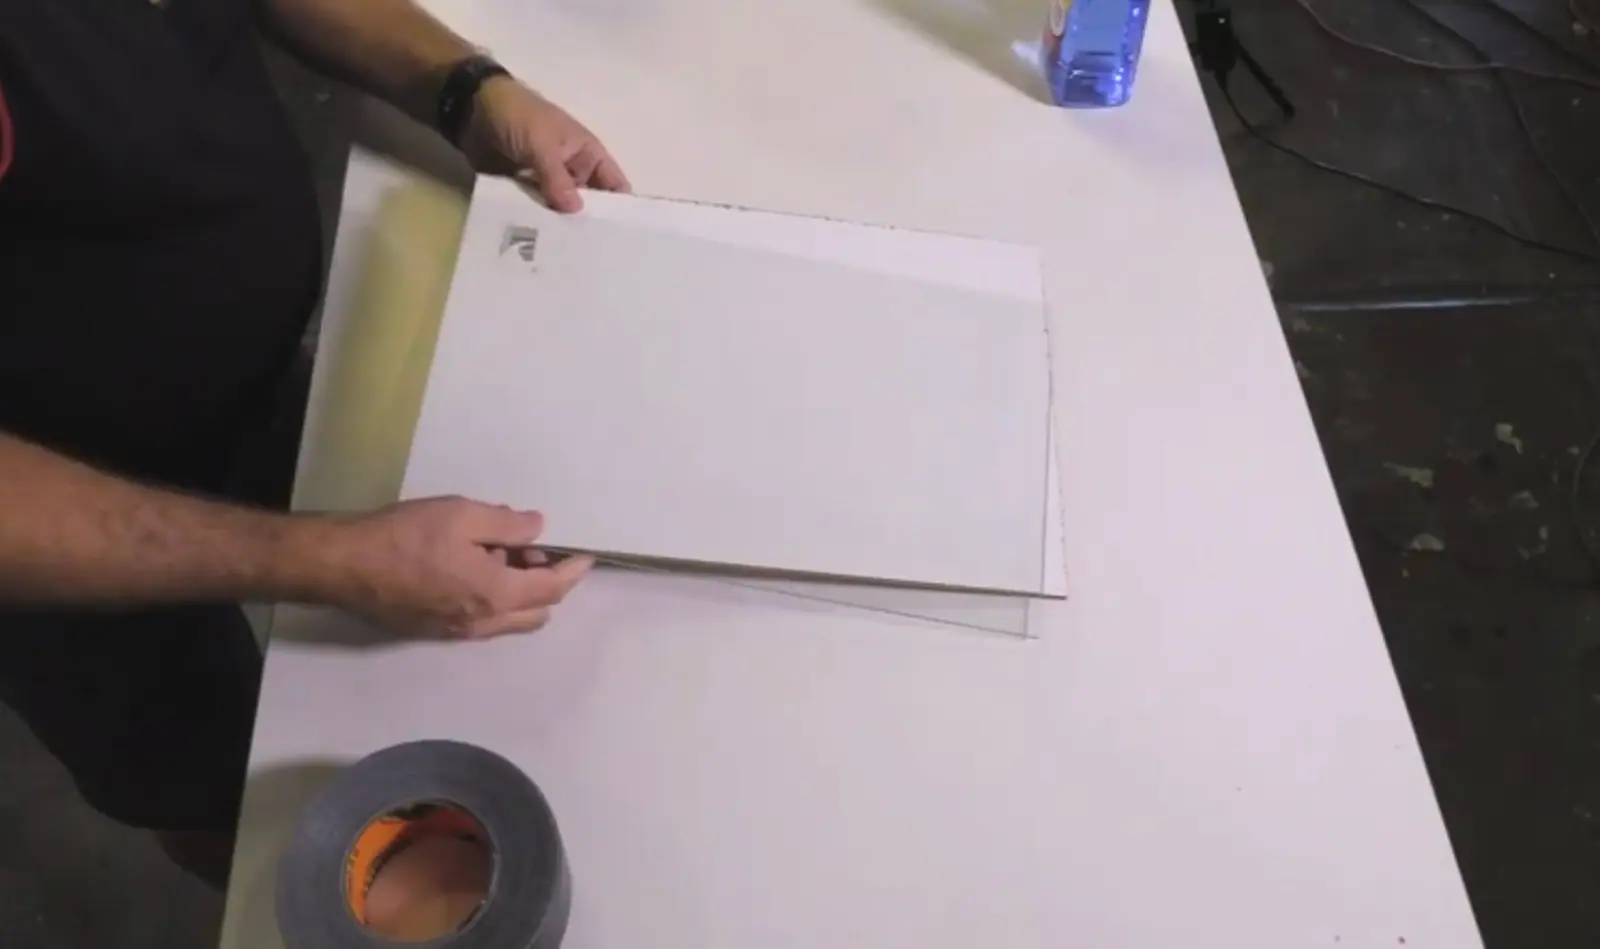
- Clean the glass. Wipe both sides until there are no fingerprints or dust. Anything trapped under the glass will be visible while you paint, so it is worth doing well.
- Lay down the white backing. Set your white-painted board, or your board plus a cut sheet of white paper, on your work surface, white side up.
- Place the glass on top. Center the glass over the backing. Because the board is slightly larger, you should see a thin margin of wood all the way around.
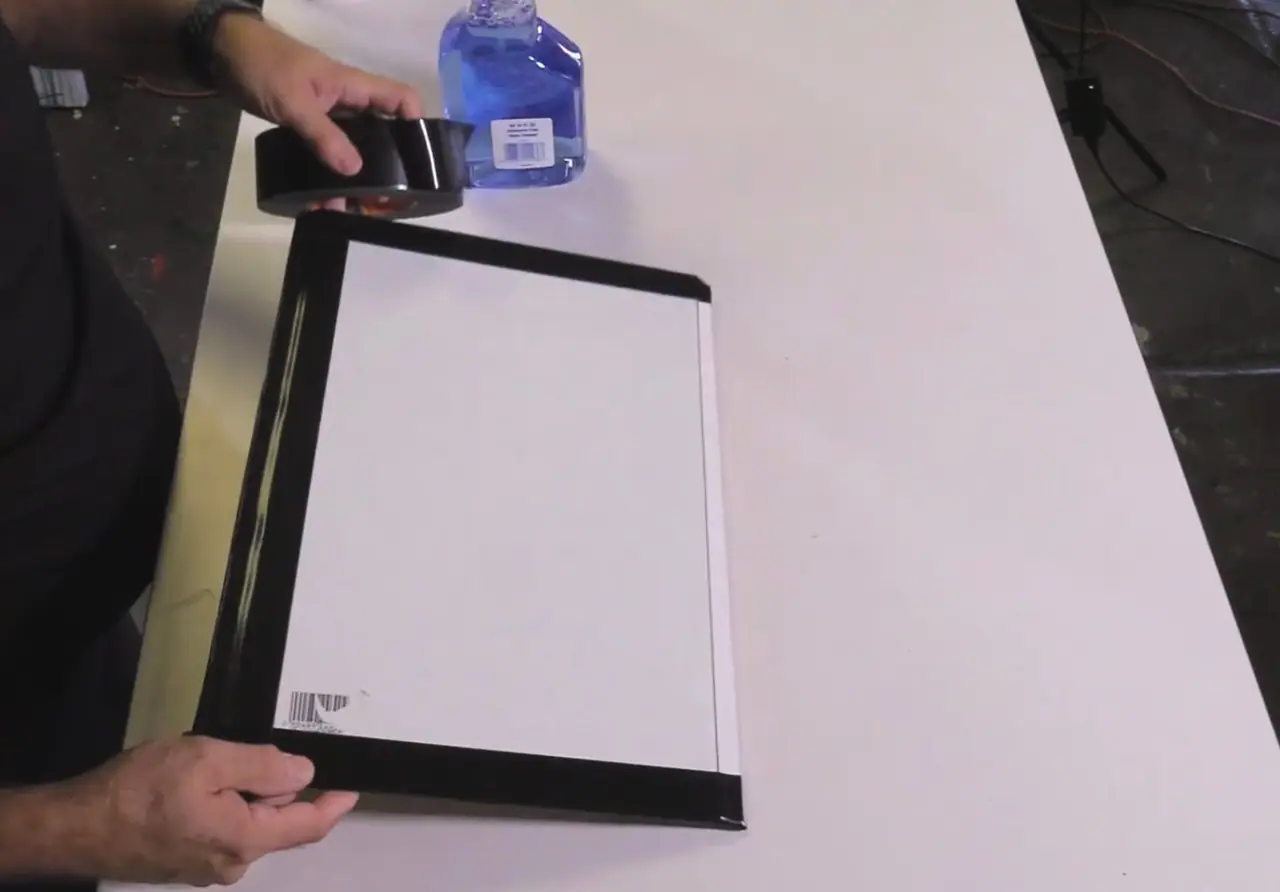
- Tape the edges. Run the duct tape along each edge of the glass and board, pressing it flat. Leave enough tape past the edge that you can fold it over onto the back of the board. This locks the glass to the backing and, just as importantly, covers every sharp edge so the palette is safe to handle.
- Fold and finish the back. Press the folded tape down on the underside so the whole thing feels solid in your hand. Run your finger around all four edges to confirm no glass is exposed.
That is it. You now have a reusable mixing surface that will outlast any pad of palette paper.
What size should you make your paint palette?
For everyday painting, make your palette at least 16 by 20 inches. That gives you room to lay out a full range of colors along the edges and still keep a generous open area in the middle for mixing, which is exactly where beginners tend to run out of space. A cramped palette forces muddy, crowded mixing, so err on the larger side.
You can always customize the size for how you actually work. Go bigger for large canvases or a permanent studio setup where the palette stays put. Cut a smaller, lighter version for plein air and travel, where you need something you can carry. Many painters end up with two: a big studio palette and a small portable one.
Why is a glass palette better than wood or palette paper?
A glass palette wins on cost, cleanup, and waste. It is inexpensive to make, especially if you repurpose thrifted glass, and a single one lasts for years, so you are not constantly buying fresh pads of palette paper or tossing paper plates. Over time that saves real money, and money you do not spend on disposables is money you can put toward other art supplies.
The performance reasons matter just as much. Glass is smooth and non-absorbent, so it does not soak up your medium or stain the way bare wood does. Your mixing colors stay clean and true, and the surface gives you honest feedback about the color you are actually making. Cleanup is the real joy: you scrape and wipe the glass while the paint is still soft and it comes back to a fresh, clear surface in seconds. If you want the full routine, here is how to clean a paint palette for both oils and acrylics, including how to handle dried-on paint.
A glass palette also pairs naturally with a palette knife, since the hard surface gives you a firm edge to drag and scrape against without chewing up the palette itself.
Quick tips for getting the most from your palette
A few small habits keep your homemade palette working like new. Pick the ones that fit how you paint.
- Mix toward the center, lay colors around the edge. Keep your pure colors in a consistent order around the rim and reserve the middle for mixing. A predictable layout speeds up your painting and keeps your mixes clean.
- Clean it while the paint is soft. Scrape and wipe at the end of each session instead of letting paint harden. Soft paint comes off in seconds; cured paint takes a razor blade.
- Keep a neutral surround. The gray tape and white or gray backing are not just for looks. A neutral field around your paint is what lets you judge color accurately, so resist the temptation to decorate it.
- Make a second one for travel. Once you have built one, the second takes ten minutes. A small palette in your bag means you are always ready to paint outside the studio.
If you want a step-by-step demonstration, John Milan walks through this exact build in a short video tutorial on the Milan Art Institute YouTube channel.
Learning to make your own simple tools is part of becoming a self-sufficient artist, and it is the kind of small, practical skill that adds up. If you are just getting started and want a structured way to put a brush in your hand, our free Two Week Challenge walks you through making your first paintings. And when you want to keep building your fundamentals, the rest of the oil painting techniques collection is here whenever you are ready.
Frequently asked questions
How do you make a DIY paint palette?
Sandwich a clean piece of glass over a white or light gray backing on a board cut slightly larger than the glass, then wrap solid neutral duct tape around all four edges. Fold the tape over the back so no sharp glass is exposed. Tempered glass or the glass from a thrifted picture frame both work, and the build takes about ten minutes.
What kind of glass should I use for a glass palette?
Use real glass, ideally tempered glass, because it is more durable than plexiglass and resists scratching from your palette knife. Make sure it is clean and free of fingerprints before you build. You can buy a cut piece at a hardware or glass store, or save money by repurposing the glass from an old picture frame at a thrift store.
What size should a paint palette be?
For everyday painting, make your palette at least 16 by 20 inches so you have room to lay out and mix plenty of color. You can size it up for large canvases or studio work, or cut a smaller one for plein air and travel. The right size depends on the kind of painting you do most.
Why use a glass palette instead of wood or palette paper?
A glass palette is inexpensive to make, wipes clean in seconds, and is reusable for years, so it produces far less waste than disposable palette paper or paper plates. The smooth surface does not absorb paint or stain the way bare wood does, which means your mixing colors stay clean and true every time you sit down to paint.
What color should the backing of a glass palette be?
Paint the backing white, or slip a white sheet of paper between the glass and the board. White gives you a neutral surface that shows your colors accurately as you mix. A light neutral gray is an excellent option too, since it sits closer to a midtone, but plain white works beautifully if you are not confident matching a specific gray.
What to practice this week
- Build one glass palette this week from a thrifted picture frame, a scrap board, and a roll of solid gray duct tape, then mix a six-color string on it to test the surface.
- Cut or buy your everyday palette at 16 by 20 inches and a second small palette for travel, so size never limits where you paint.
- After each session, scrape and wipe your glass palette clean while the paint is still soft, so it is ready the moment you want to paint again.
Supplies used

About the author
More from Elli