Digital Art Programs: The 12 Worth Using, Sorted by Device and How You Pay
Twelve programs painters actually use, which device each one runs on, whether it's free, bought once or rented monthly, and how to pick one without buying three.
For a painter, the best digital art programs are Procreate on an iPad, Krita or Adobe Fresco if you want a free one, and Clip Studio Paint or Rebelle if you’d rather buy once for a computer. If you build painting sources from photos, add Photoshop or Pixelmator Pro. That’s the short list. The longer answer depends on two things you already know: which device you own, and whether you’d rather pay once, pay monthly, or pay nothing.
Most lists hand you twenty apps and a feature table. You don’t need twenty. You need the one that runs on the thing in your lap and charges you the way you can live with. So this list is sorted by those two questions, and it leans on how we use these programs in our online painting course, the Mastery Program: to build a source (the reference image you compose yourself, then paint from), and to test an idea before it costs you a canvas.
What is a digital art program?
A digital art program is software that lets you draw, paint or layer images on a screen with a pen or a finger, the way you’d use a brush on canvas. Some are built for painting (Procreate, Krita, Rebelle). Some are photo editors that painters borrow for layering reference photos into a single source (Photoshop, Pixelmator Pro, Affinity). A good one does five things well.
- Feels how hard you press. A light touch gives a thin line and a heavy one gives a thick line, the way a pencil does.
- Works in layers. Each picture you add sits on its own layer, like a sheet of clear plastic over the one below, so you can move it, shrink it or delete it without touching anything else.
- Blends layers. A setting like lighten or overlay lets the photo on top show through to the picture beneath it, instead of sitting on it like a sticker.
- Has an eraser you can turn down. An edge then fades softly into the background instead of leaving a hard white mark.
- Exports a clean file. You can print it or paint from it, with no watermark across the middle.
Every program below does those five things. The differences are device, price and how it feels in your hand. The twelve on this page: Procreate, Adobe Fresco, Krita, Clip Studio Paint, Rebelle, Photoshop, Pixelmator Pro, Affinity, Sketchbook, Medibang Paint, Pixlr and GIMP.
How do digital art programs charge you?
Three ways: you buy the program once, you rent it monthly, or it’s free. Decide this before you look at a single feature, because it’s the thing you’ll still be paying (or not paying) five years from now.
Buy once. Procreate is the famous example, sold in the App Store with no subscription. Clip Studio Paint sells a pay-once license for Windows and Mac. Rebelle is a one-time purchase too. Pixelmator Pro on a Mac can still be bought outright from the Mac App Store. The Pixelmator we use in our own source-making lesson was bought once, years ago, for about fifty dollars, and it still does the job.
Pay monthly. Photoshop comes through an Adobe Creative Cloud subscription. Clip Studio Paint on an iPad or Android tablet is subscription only. Apple’s Creator Studio bundle, launched in January 2026, is a second way to get Pixelmator Pro, and the way to get it on an iPad. A subscription keeps you on the newest version, which matters to a photographer and rarely to a painter. Unless you already pay for Adobe, we’d buy once.
Free. Krita is a free, open source painting program. Adobe Fresco is a free painting app for iPad, iPhone and Windows. Affinity, a photo, vector and layout editor made by Canva, is free for individuals. Medibang Paint and Sketchbook are free painting apps on a phone or tablet, Pixlr is a free photo editor in a browser, and GIMP is a free photo editor for a computer.
If a program is going to be a big part of how you make art, buy a good one and get good at it. The warning in our lesson is specific: we’ve seen student sources built in a limited free phone app, and they have weird edges, blending that won’t cooperate and a short list of tools, so the student ends up fighting the app instead of composing. Free is fine when the free program is a serious one, and Krita, Fresco and Affinity all are. Free is a problem when it means the first app that came up in the store.
Which digital art program is best for iPad?
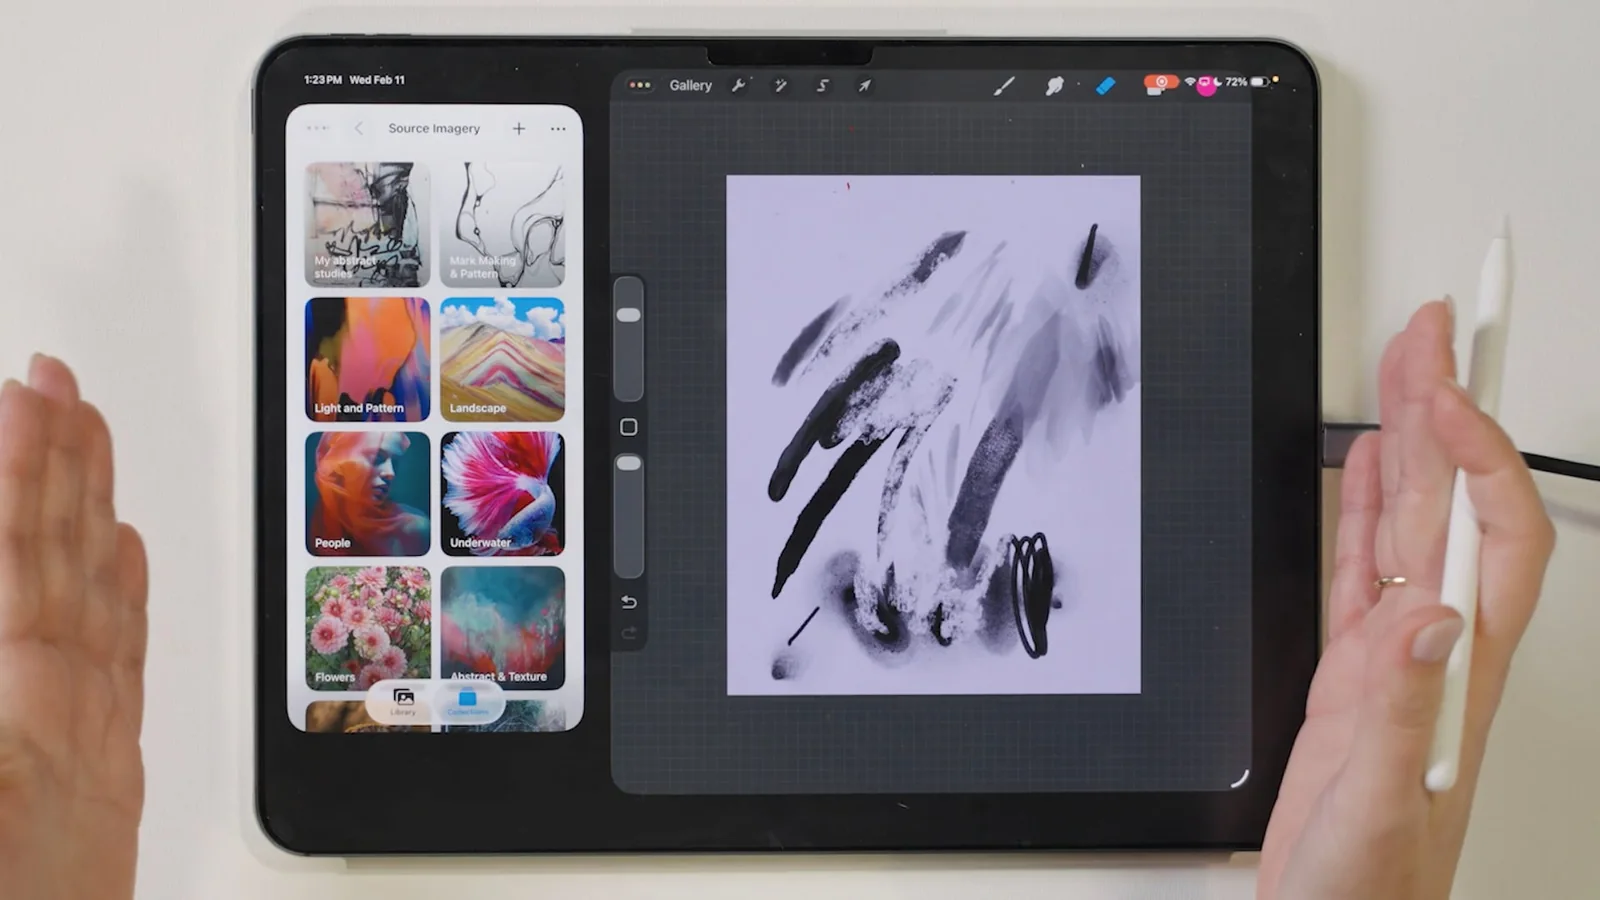
Procreate, for most painters. It runs only on the iPad (Procreate Pocket is the iPhone version), it’s bought once, and it feels closer to real drawing than anything else on this list. The Apple Pencil reads pressure, so a stroke starts thin and thickens as you press. The brush library covers inks, watercolor, oil and even spray paint. The smudge and eraser tools use those same brushes, so you can soften a mark with a watercolor brush instead of a hard circle.
Alana, who teaches the Procreate lesson in our course, came to painting from design work, and she uses Procreate less as a place to finish art and more as a playground. A layer of spray-paint marks. A watercolor study from her own folder dropped on top with the opacity turned down. A betta fish photo pasted in and blended at the edges until it belongs to the background. The goal is a source worth painting, and she’s clear that chasing a perfect digital picture misses the point, because the painting is where your voice goes.
Two practical notes from our lessons. You don’t need an iPad Pro: an iPad Air with an Apple Pencil is enough. And if you’re partway through a painting and can’t decide whether the dress should be red or yellow, photograph the canvas, open the photo in Procreate and paint the dress both ways on a new layer. You’ll know in five minutes instead of two repaints.
If you’d rather spend nothing, Adobe Fresco is free on the iPad (and on Windows) and has live oil and watercolor brushes that blend on screen. Clip Studio Paint runs on the iPad by subscription. Pixelmator Pro arrived on the iPad in 2026 inside Apple’s Creator Studio bundle, and Affinity has an iPad version too.
Which digital art programs work on a Mac or Windows computer?
On a computer the choice splits by what you’ll do with it. For painting on screen: Krita, Rebelle and Clip Studio Paint. For layering photos into a painting source: Pixelmator Pro, Photoshop, Affinity and GIMP.
- Krita (Windows, Mac, Linux). Free and open source, made by artists, with a deep brush engine, stabilizers for shaky lines and layers that work the way Photoshop’s do. If you have a pen tablet and no budget, start here.
- Clip Studio Paint (Windows, Mac). Buy once for the desktop version. The PRO edition covers illustration, and EX adds comics and animation. It also runs on tablets and phones, but only by subscription.
- Rebelle (Windows, Mac). Buy once. It simulates wet paint: watercolor that runs and pools, oils that drag, pastels that crumble. If you paint with real media and want the screen to behave like paper, this is the one built for you.
- Pixelmator Pro (Mac). The program our source-making lesson is taught on. It handles layers, blend settings, a one-click background remover and a soft eraser without Photoshop’s learning curve. On a Mac it’s the one we recommend over Photoshop for a painter: friendlier and far cheaper.
- Adobe Photoshop (Windows, Mac, iPad). The industry standard, by subscription. It does everything Pixelmator does and a great deal more, and most of the extra is for photographers and designers. If you already pay for it, use it. If you don’t, you don’t need it.
- Affinity (Windows, Mac, iPad). Free for individuals since Canva took it over, with vector, photo and layout tools in one app. It’s the one to open when a reference photo needs a lamppost removed or two skies joined.
- GIMP (Windows, Mac, Linux). Free and open source photo editing with layers. The menus feel like 2005, and it will still cut a horse out of a photo on a ten-year-old laptop for nothing.
- Sketchbook (Windows, Mac). The tablet app is free; the desktop version costs a little. A clean interface and good pencils for sketching ideas before you build a source.
Whichever you pick, the lesson is the same in all of them: layers, a blend setting, a soft eraser. Learn those three in one program and you can sit down at any other and find them in ten minutes.
Which digital art programs work on Android or a phone?
Krita runs on Android tablets, Clip Studio Paint runs on Android by subscription, and Medibang Paint and Sketchbook are free on both Android and iPhone. Pixlr runs in any browser, so it works on a Chromebook or a borrowed laptop. On a phone, Snapseed and Photomator handle quick edits to a reference photo, which is usually all a phone is good for. The screen is too small to build a layered source comfortably.
If you draw on a Windows PC with a Wacom or similar pen tablet, you’re in the computer list above: the tablet gives the computer pressure and a pen, and the program does the rest.
How do painters actually use a digital art program?
Mostly to build a source: a composed reference image, layered from several photos and abstracts, that you then paint from. Our source-making lesson walks through it in Pixelmator, and the steps are the same in any program on this list.
- Collect first. Keep a folder with three kinds of images: backgrounds (color, abstracts, photos of your own abstract paintings), subjects (the animal, figure or object) and embellishments (a light source, flowers, brushstrokes).
- Build back to front, like a painting. Start with a dark base if you like light emerging from dark, drop the background in, then put the subject on top. Keep the layers panel open so you always know which layer you’re touching.
- Let the blend setting do the merging. Lighten drops a light image onto a dark base so the light shows and the dark falls away. Overlay gives a double-exposure look. Click through them and keep the one you like.
- Erase with the eraser turned down. Full-strength erasing leaves hard marks. Lower the opacity and the subject’s edges fade into the background, the same integration you want with a brush.
- Stack copies of the subject. Duplicate the subject layer, set one copy to normal so the head reads clearly, erase everything else on that copy, and let the body stay blended underneath.
- Make five, paint one. The first source is rarely the best one. Make five, six or seven in a sitting and paint only the one that gets you excited. The rest are studies.
A program earns its keep beyond sources, too. Lay a photo of your canvas over your source at half opacity and the proportions that are off jump out at you.
One caution from the same lesson. An image pulled straight from an AI generator already has someone else’s voice in it. What makes a source yours is the arranging: the light you chose, the abstract you painted, the pairing nobody else would try. The program is where you do that arranging. For the fuller method, device by device, see our guide to graphics programs for creating painting sources. For where the raw photos come from, start with reference photos for painting.
Do you need a digital art degree to learn this?
No. If you typed “digital art programs” looking for a course rather than software, here’s the honest answer: the program is the pencil, and nobody needs a degree to learn a pencil. What takes years is the part no software does for you: drawing what you see, controlling value, building a composition and mixing color on purpose. Those skills are the same whether the brush is sable or a stylus, and they’re what a program should serve. If you’re weighing a college digital art program against learning online, two of our guides lay out the paths: is art school worth it and self-taught artist vs art school. If you’d rather start with the skills themselves, begin with drawing fundamentals.
How do you choose one without buying three?
Pick the device you already own, then the payment you can live with, then one program. Give it two weeks of real use before you judge it. Our lesson puts it bluntly: it doesn’t take long. Two weeks of a few hours a day and you’ll know the program better than the person who showed it to you. Nobody enjoys a thing they’re still bad at, so the learning curve isn’t the verdict.
If after those two weeks you still hate working on a screen, that’s a good answer too. Make your sources in a sketchbook or with cut paper, and nobody will see the difference in the painting. For the rest of the kit around the program (tablets, color tools, organizing apps), our guide to digital art tools covers it.
Pick a program this week, build five sources in it, and paint the one that makes you want to cancel your evening plans. If you want a teacher beside you for those first paintings, our Two Week Challenge is a guided painting course that walks you through them step by step, so the program you just picked has something to serve. And the rest of the oil painting techniques collection is here when you want more.
Frequently asked questions
What is the best free digital art program?
Krita on a computer and Adobe Fresco on an iPad. Both are serious programs, with pressure-sensitive brushes, layers and blend settings, and neither charges you or stamps a watermark on your file. Affinity is also free for individuals and is strong for combining reference photos. Pick one of those three over a pocket app with a handful of brushes.
Do you need a drawing tablet to use a digital art program?
On an iPad, you need an Apple Pencil, because the pencil is what reads pressure. On a Mac or Windows computer, yes, you need a pen tablet (a Wacom or similar), since a mouse can't make a line thin and then thick. On a phone, your finger is enough for quick edits to a reference photo, but it's a poor way to build a layered source.
Is Procreate available on Windows or Android?
No. Procreate runs only on the iPad, with Procreate Pocket for the iPhone. The closest matches on Windows are Clip Studio Paint, Krita and Adobe Fresco. On Android, Krita and Clip Studio Paint do the same job, and Medibang Paint is free.
What is the difference between Photoshop and Procreate?
Photoshop is a photo editor by subscription that runs on computers and the iPad, and painters use it mostly to layer photos into a painting source. Procreate is a painting app, bought once, that runs only on the iPad and feels like drawing. If you'll mainly build sources from photos, Photoshop or Pixelmator Pro fits. If you'll mainly paint on the screen, Procreate fits.
Can you plan an oil painting in a digital art program?
Yes, and that's how we teach it. Build the source in layers, test a second color or a second subject on a photo of the painting in progress, and lay a photo of your canvas over the source at half opacity to see which proportions are off. You plan on the screen and paint on the canvas.
Which iPad do you need for Procreate?
An iPad Air with an Apple Pencil is enough. The teacher of our Procreate lesson works on an iPad Pro, and when a student asked for the minimum, her answer was the Air. The Pro has a bigger, brighter screen, but nothing on it changes what you can make.
What to practice this week
- Pick one program from this list for the device you already own, and build three sources in it this week. Paint none of them yet.
- Photograph a painting in progress, open it in your program, and try one change on a new layer (a second subject, a different color) before you touch the canvas.
- Build one source back to front: a dark base, a background, a subject on the lighten setting, and edges erased with the eraser turned down to 20 percent.
Supplies used
About the author
More from Elli