What Changes the Character of a Line in a Painting (and How to Control It)
A line can look nervous, confident, soft or sharp before anyone works out the subject. Most of that comes from your body and your hand.

A line can look nervous, confident, soft or sharp before anyone works out what it is drawing. Four things decide that look, and you can learn to control all four: where the line starts in your body, how hard you press, what you draw with, and how much you vary your marks. The lessons behind this post use pencil, charcoal and pen, but the same four things carry over to a brush.
Where does a line’s character start?
Most stiff lines start in the wrist. A stiff line is short, jerky and hard to steer, and it usually comes from a hand doing all the work. Draw from the shoulder instead. Let the arm swing from the shoulder like a pendulum, with the wrist firm and the hand resting lightly on the paper. The line comes out straighter and more even, because the whole arm is carrying it.
Your body matters too. Stand if you can. Set your easel or drawing board so your shoulders square to the paper and your body stays open. A hunched, closed body makes hunched, closed marks. If you have to sit, sit on a stool with your shoulders square and draw as if you were standing.
How does your grip change a line?
Hold the pencil or charcoal stick toward the far end, not up near the point. If you pinch it near the tip and squeeze, you get dark, heavy lines that don’t flow. Hold it back with a loose grip, and the lines get light and fluid. You should be able to hear the stroke, a soft scratch on the paper.
Here is a quick check. After a few minutes, look at the side of your hand. If it’s smudged with graphite or charcoal, your arm is moving across the paper. If it’s clean, you’re drawing with your fingers. Spend ten to fifteen minutes on up and down strokes, side to side strokes, and both diagonals before you move on.
How much does pressure change a line?
Pressure is the dial that takes a line from faint to dark. Start a stroke with light pressure, press harder in the middle so the line gets dark, then ease off to light at the end. Practice that dark to light to dark stroke until it feels natural. It can take a few weeks of warm-ups. Once you can do it, you can darken a line you already drew by going over it with more pressure.
Repeated light strokes build tone too. Instead of pressing harder for a deep value, go over the same area with many light strokes. The tone builds through repetition, and each stroke stays fluid.
Circles and ellipses are the next test. Almost every shape you draw is built from straight lines, ellipses and circles, so these show how fluid your line really is. Lay down a set of light marks going around the shape, both ways. Then pick the one that looks right and press it darker.
Does the tool change the character of a line?
Yes, and the difference is bigger than most people expect. Charcoal is soft and dark, and it disappears fast if you touch it. A softer pencil is harder to erase, which is fine, because it makes you draw lightly from the start. A pen stays where you put it, so you have to commit to each stroke. Some markers have a thick side and a thin side, so one tool gives two line weights.
Why does a painting need more than one kind of line?
Because the same line everywhere gets boring fast. I fall into that trap too, making one line over and over. The fix is to change the marks on purpose. Go back over a few lines with more pressure. Scribble around others. Fade a few out. Mix a hard press, a fine scribble and a smudged shade in the same area.
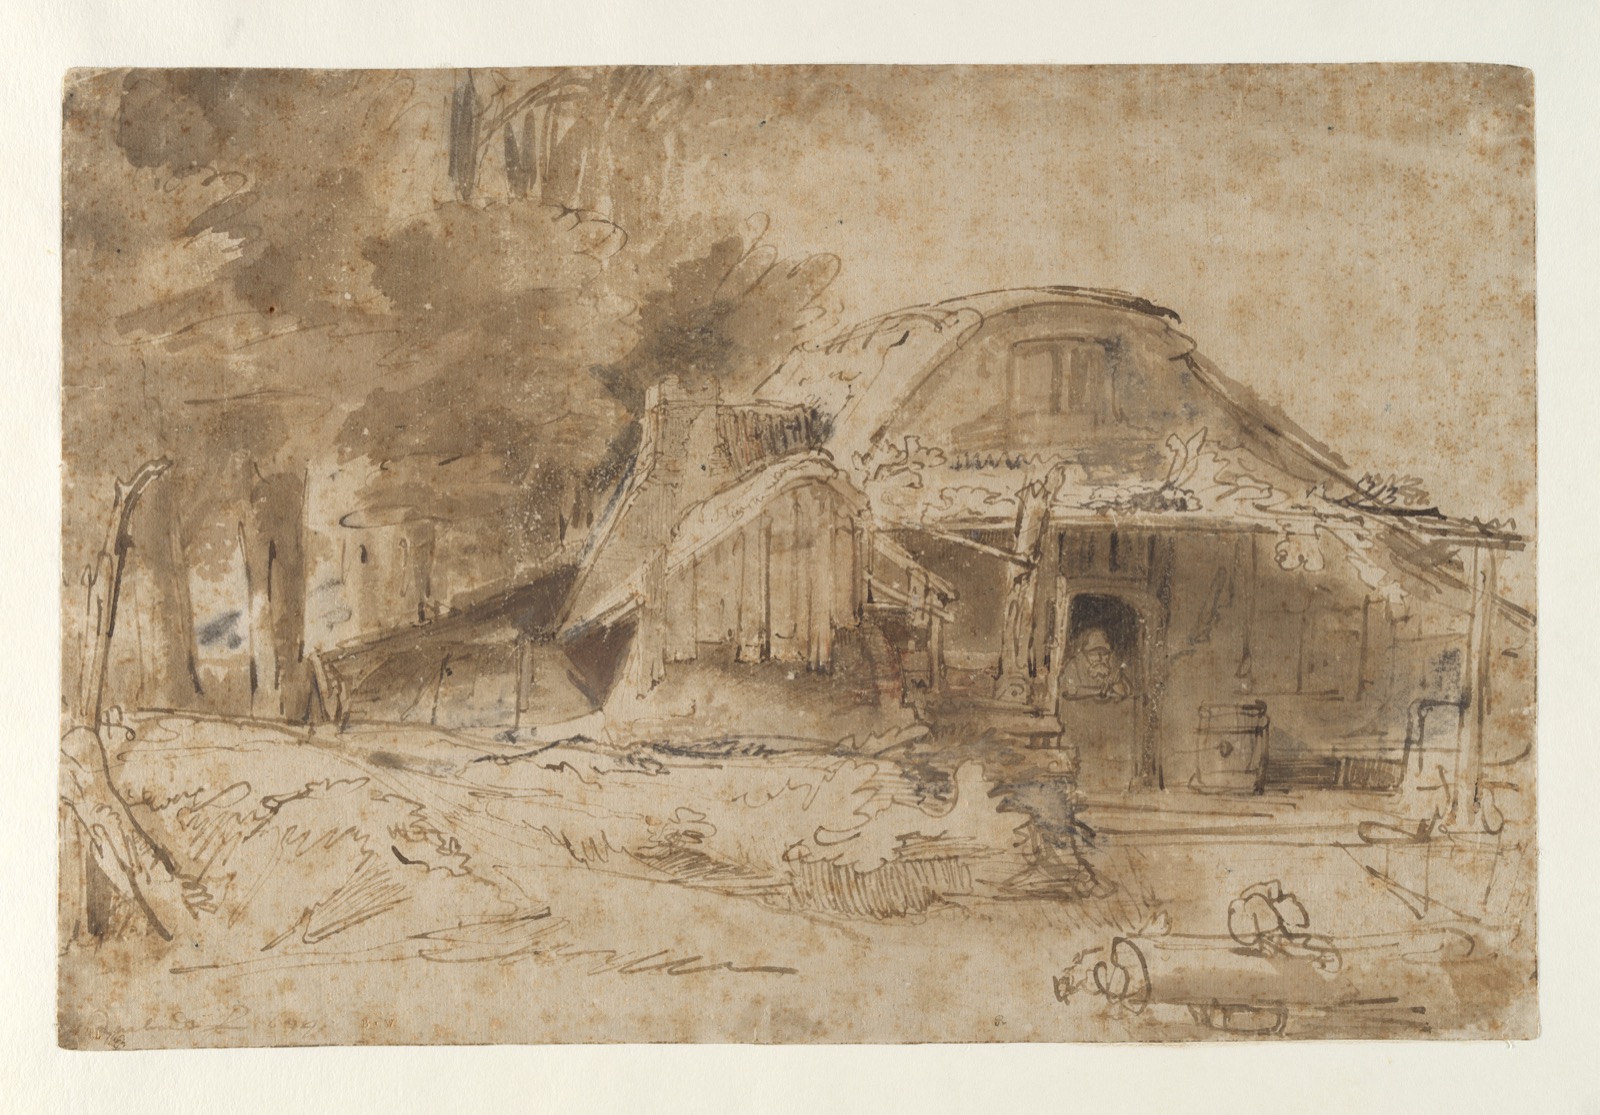
Look at the Rembrandt drawing at the top of this post. The doorway has dark, pressed strokes, and the ground at the bottom is made of faint, broken marks. Same artist, same pen, and the change in line is what tells you where the light falls and where the eye should go.
Do all lines have to stay visible?
No. A line tells the viewer where one thing stops and another starts. Where there is a real edge, such as the rim of a cup or a fold in fabric, a hard line is the right tool. Where two areas of similar value meet with no real edge, let the change happen through tone. A light wall next to a slightly darker wall needs no outline. The shift in value does the work.
In a cardboard box drawing lesson, the advice goes further. By the end, most of the lines you started with should be gone. The drawing should read as tone against tone, with lines only where something actually turns. Keep the line where a real edge exists, and soften everything else.
How do you practice controlling a line?
Work through these in order, for ten to fifteen minutes each.
- Warm up with light, fluid strokes in every direction, from the shoulder. Keep the wrist firm and the grip loose.
- Practice the dark to light to dark stroke on one line, top to bottom.
- Draw circles and ellipses with a set of light marks, then press the best one darker.
- Build a tone by repeating light strokes instead of pressing harder. Listen for the sound of the stroke, since a fluid line sounds steady.
- Step back and look for the lines that feel stiff or stuck. Redraw one of them from the shoulder.
How do you know when the lines are finished?
Step back, look at the drawing from across the room, and ask someone else what they see. If every line is doing a job, the drawing is close. If a line is there only out of habit, take it out. Trust the moment when the drawing stops needing changes. Stopping at the right time is a skill too.
Line is one of the elements you can practice with almost nothing: a pencil, a scrap of paper and a few minutes. To see what different lines communicate, read how artists use line to create movement and emotion. For how line works alongside shape, value and color, the guide to the 7 elements of art is the next step.
If you’d like guided practice with these exercises, our 2-week challenge is one place to start.
Frequently asked questions
Why do my lines look stiff and heavy?
Stiff lines usually start in the wrist and get pinched by a tight grip near the tip of the tool. Draw from the shoulder with the arm swinging like a pendulum, hold the pencil or stick back with a loose grip, and keep the pressure light. The line loosens as soon as the arm does the work.
How do you make lines look fluid instead of shaky?
Practice straight strokes in every direction with light pressure for ten to fifteen minutes at a time. Fluid lines come from a steady arm and a relaxed hand, not from slowing down. Circles and ellipses are good tests, because a shaky line shows up quickly on a round shape.
Does the drawing tool change how a line looks?
Yes. Charcoal is soft and dark and disappears fast. A soft pencil is harder to erase, so it pushes you to draw lightly. Pens stay put, so you have to plan each stroke. Some markers have a thick side and a thin side, which gives two line weights from one tool.
Should every line stay visible in a finished painting?
No. Keep a hard line where there is a real edge, such as the rim of a cup or a fold in fabric. Where two areas of similar value meet with no real edge, let the change happen through tone instead. By the end of most drawings, many of the first lines have been softened or taken away.