Subtractive Drawing: What It Is and How to Pull Light Out of Charcoal
Most beginners build a drawing by adding lines. Subtractive drawing flips that: you cover the page in charcoal and erase the light back out. It is how you learn value, and the door into chiaroscuro.

Subtractive drawing, also called reductive drawing, is a technique where you cover the whole paper in a layer of charcoal first, then erase the light areas back out instead of adding them in. The eraser becomes your drawing tool. Because you start from a mid-tone and work toward both light and dark, it teaches value faster than almost anything else, and it is the doorway into the dramatic light and shadow the Old Masters used.
Light and dark are the real tools of drama in a drawing, and as an artist they are yours to command. The same control that makes a Caravaggio glow out of the darkness is something you can train, and subtractive drawing is one of the most direct ways to start. Here is what it is, why it works, and how to do it.
What is subtractive (or reductive) charcoal drawing?
Subtractive charcoal drawing is the technique of building an image by removing charcoal rather than adding lines. Most artists and students start a drawing the opposite way, by placing line after line on blank paper. That is the additive technique, and it is how nearly everyone first learns to draw.
Subtractive drawing works in reverse. First you cover the whole sheet with an even coat of charcoal, which becomes the mid-tone of your drawing. Then you erase the details out with a kneaded eraser, so the eraser replaces the pencil in the mark making stage. You are not drawing the shadows. You are lifting out the light.
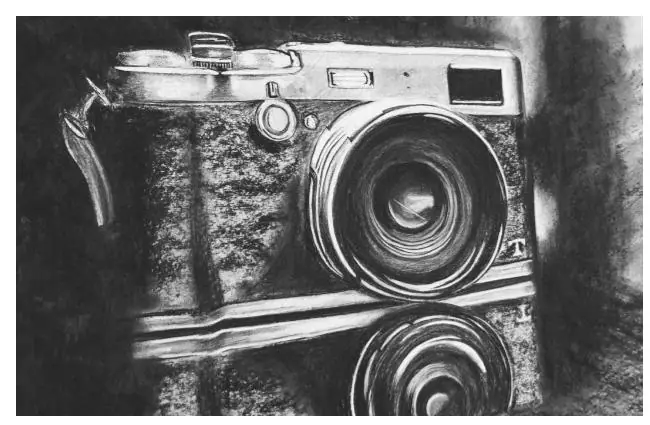
In the camera drawing at the top of this post, the shiny spots on the body are places where you can see subtraction in action. Most of the lighter areas were erased back out of the charcoal ground with a kneaded eraser. Artists also reach for line erasers, the kind shaped like a click ink pen, to pull fine, crisp light lines into a drawing like this.

What does subtractive mean in art?
In art, subtractive means making an image by taking material away rather than adding it. That single idea shows up in several places. In drawing, you remove charcoal to reveal light. In sculpture, a carver removes stone or wood until the form appears, which is why carving is called a subtractive process. In color theory, subtractive mixing describes how pigments and inks absorb wavelengths of light, the opposite of how screens add light together.
The common thread is direction. An additive process puts material onto a blank surface. A subtractive process starts with a full surface and removes material until the picture emerges. Subtractive drawing is the most hands on way to feel that difference, because you can literally watch a face or an object surface as you erase.
How do you do a subtractive drawing, step by step?
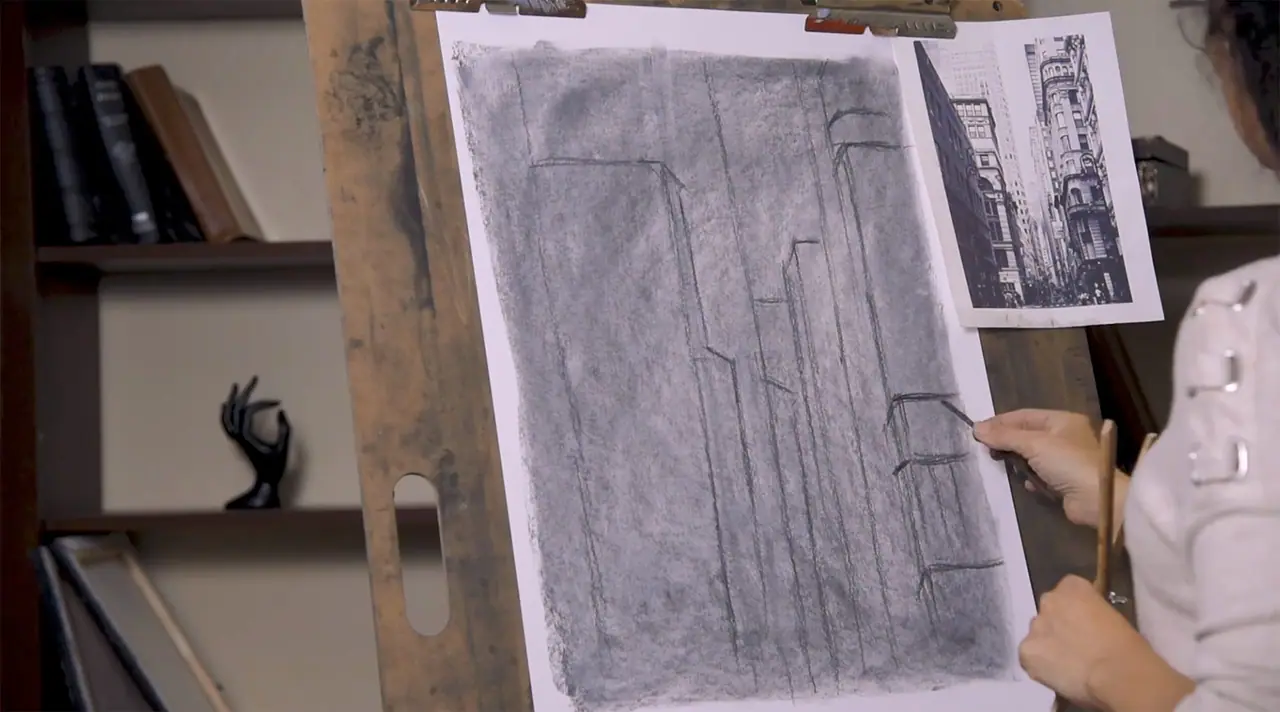
You do a subtractive drawing by laying a charcoal ground, lifting out the lights, then adding the darks back in. The whole process is a small number of clear steps, and the order matters.
- Lay an even charcoal ground. Cover the entire sheet with a smooth, consistent layer of charcoal. Vine charcoal or powdered charcoal rubbed in with a cloth spreads the most evenly. This gray field becomes your mid-tone, the five on a value scale of one to ten.
- Erase out the lightest shapes first. With a kneaded eraser, lift out the brightest areas of your subject before any detail. Squint at what you are drawing so you only see the big light shapes, and pull those out first. The white paper underneath is your value ten on the light end.
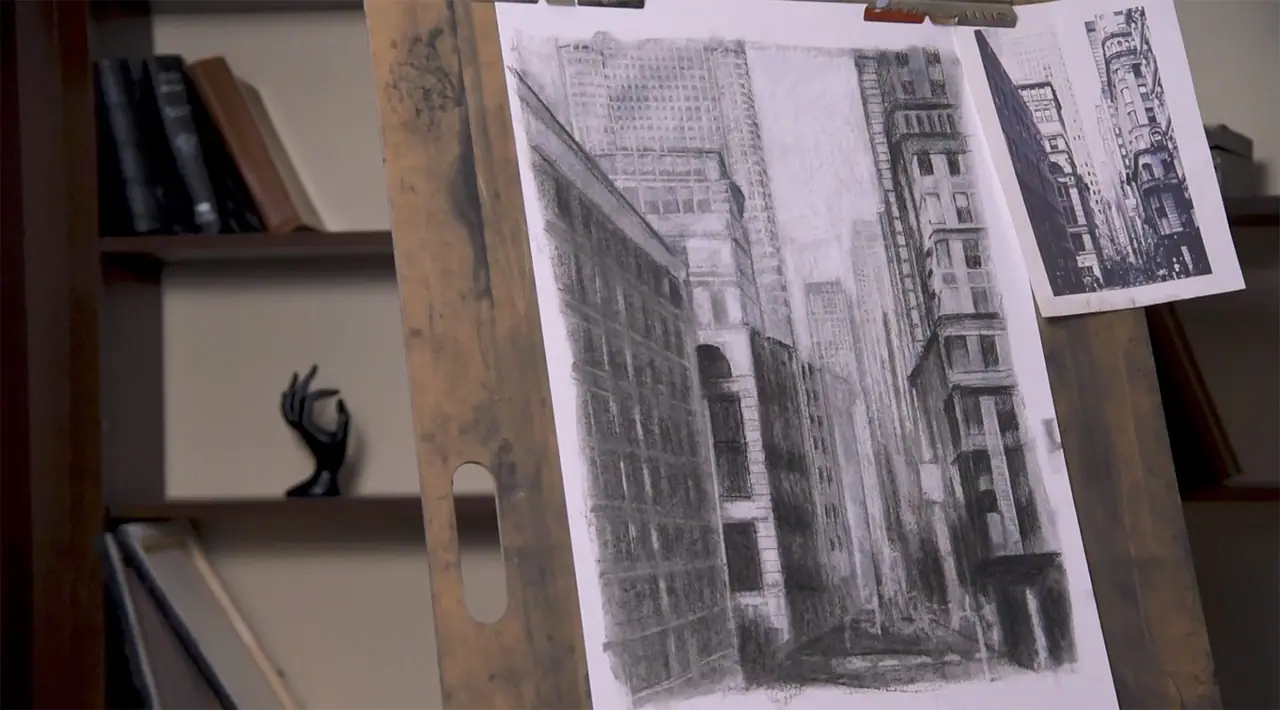
- Refine with a harder eraser. Switch to a firmer eraser or a click style eraser pencil to sharpen edges and cut crisp highlights. This is where the drawing starts to read, because clean light shapes against the gray ground create instant form.
- Add the darks back in. Take a charcoal pencil or compressed charcoal stick and push the shadow areas down to their true darkness, as dark as a one on the value scale. This is additive work inside a subtractive drawing, and it is what completes the range.
- Work back and forth until it lives. Keep moving between erasing lights and adding darks, adjusting as the whole image settles. Continually refining in both directions is what eventually gives the drawing depth and life.
Are additive techniques ever used in subtractive drawing?
Yes. After the initial image is erased into the charcoal, you go back over the drawing with charcoal and add in darker lines and areas of shading. Almost every finished subtractive drawing is really a blend of both directions.
That blend is what gives you a complete range of values. In a subtractive drawing the one on the value scale is the white of the paper, and the ten is the darkest dark, made with a charcoal pencil or stick. By laying a charcoal ground at the start, you create a mid-tone, a five on the scale, before you make a single mark. Adding darker charcoal over the areas that are meant to be deep shadow builds the values up toward that ten, and working the drawing this way is exactly what makes it feel three dimensional rather than flat. If you want the bigger framework behind all of this, value is one of the seven elements of art every drawing depends on.
Why do a subtractive drawing?
You do a subtractive drawing because it is one of the fastest ways to learn value and the chiaroscuro technique of the Old Masters. Creating a strong subtractive drawing takes practice, but the practice pays off, because the method forces you to think about how light or dark every area should be instead of just outlining shapes.
It is also the foundation for subtractive painting. The only real difference is the medium. Instead of laying a charcoal ground and erasing into it, you lay a ground in paint and wipe the paint away to find the initial image. The thinking is identical, which is why so many painters who command light learned it first with charcoal and an eraser. (When you do move into paint, a clean setup matters, so here is how to clean your brushes so they last.)
If your vision is to give a nod to the Old Masters and to work with dramatic light, subtractive drawing is an important technique to master. It is the same control that artists like Caravaggio used to light a world without electricity, pulling figures out of deep shadow so they seem lit from within.
What supplies do you need for subtractive drawing?
You need surprisingly little to start: a way to make the ground, a way to lift the light, and a way to push the darks. Here is the short, honest list.
- Charcoal for the ground. Vine charcoal or powdered charcoal spreads into the smooth, even mid-tone you want. Rub it in with a soft cloth or a paper towel until the page reads as a consistent gray.
- A kneaded eraser. This is your main lifting tool. You can shape it to a point for small lights or flatten it for broad areas, and it lifts charcoal softly without tearing the paper.
- A harder eraser or eraser pencil. A firmer eraser, or the click style eraser pencil that looks like an ink pen, gives you the crisp edges and fine light lines a kneaded eraser cannot.
- A charcoal pencil or compressed stick. This is how you add the darkest darks back in once the lights are established, taking your shadows down to a true ten on the value scale.
- Smooth, sturdy drawing paper. You will erase the same spots repeatedly, so a paper that holds up to that without pilling will save you a lot of frustration.
Is subtractive drawing good for beginners?
Yes, subtractive drawing is a great technique for beginners, because it teaches value almost by force. When you start from a mid-tone and have to move in both directions, you cannot avoid thinking about how light or dark each area should be, which is the exact skill most beginning drawings are missing. It also feels forgiving in a way blank paper does not. Mistakes can be erased away or covered with more charcoal, so there is room to experiment without fear of ruining the page. If you are still building your foundation, this is one of the most useful early exercises you can do.
The fastest way to put this into practice with real structure and feedback is our free Two Week Challenge, a guided way to actually make your first value drawings instead of only reading about them. When you want to keep going, the rest of the oil painting techniques collection picks up where this leaves off.
Frequently asked questions
What is subtractive drawing?
Subtractive drawing, also called reductive drawing, is a technique where you first cover the whole paper in a layer of charcoal, then erase the light areas back out instead of adding them in. The eraser does the mark making. Because you start from a mid-tone and work toward both light and dark, it teaches value quickly and underpins the chiaroscuro look of the Old Masters.
What does subtractive mean in art?
In art, subtractive means creating an image by taking material away rather than adding it. In a subtractive drawing you remove charcoal with an eraser to reveal light. The same idea names subtractive sculpture, where the artist carves stone or wood away to find the form, and subtractive color mixing, where pigments absorb light. The common thread is making the picture by removing, not adding.
What is the difference between additive and subtractive drawing?
Additive drawing builds an image by laying line and tone onto blank paper, which is how most people learn to draw. Subtractive drawing reverses that: you start with a full charcoal ground and lift the lights out with an eraser. Most finished subtractive drawings actually combine both, erasing for the lights and adding charcoal back for the darks.
What supplies do you need for subtractive drawing?
You need charcoal to lay the ground (vine or powdered charcoal spreads easily), a kneaded eraser to lift out soft light shapes, and a harder eraser or a click style eraser pencil for crisp highlights. A charcoal pencil or compressed stick lets you push the darkest darks back in. Smooth, sturdy drawing paper holds up best to repeated erasing.
Why is subtractive drawing good for learning value?
Subtractive drawing forces you to think in value because you start at a mid-tone and move in both directions, lifting toward light and adding toward dark. Instead of outlining shapes, you sculpt them out of a gray field, so you are always judging how light or dark each area should be. That is exactly the skill that makes paintings read as three dimensional.
What to practice this week
- Cover a sheet of drawing paper in an even mid-tone charcoal ground, then erase out only the three or four lightest shapes of a simple object before touching any detail.
- Build a ten step value scale: leave the white paper as one, your charcoal ground as a five, and push compressed charcoal to a true ten so you can see the full range you are working within.
- Redraw the same object twice, once additively on blank paper and once subtractively from a charcoal ground, and compare which one reads with more depth.
Supplies used

About the author
More from Elli